Whether you train for strength, for looks, or for function, you should be training your biceps. Specifically, you should be doing the incline dumbbell curl. True, the incline dumbbell curl is an old-school bodybuilding exercise that builds thick, eye-catching arms. It also promotes positional tolerance and tendon capacity — two key traits for long-term joint health.
Shoulder injuries and biceps tendon ruptures are the boogeymen of weight training that can put you out of action for a long time. The good news? The incline dumbbell curl trains the shoulder to gradually tolerate hyperextension and may make the biceps brachii tendon larger and better able to transmit load.
Adding the incline dumbbell curl to your routine will result in bigger, fuller muscles. But the immediate result is a unique combination of stretch, burn, and pump you won’t soon forget. Read on to learn why and how this classic muscle-building exercise delivers more than just arm size.
The incline dumbbell curl places more stretch on the biceps than other curl variations and virtually eliminates the use of momentum to cheat the weights up. Start with dumbbells approximately 50% of what you’d typically use for a standing dumbbell biceps curl.
Step 1 — Set Your Bench and Get Into Position
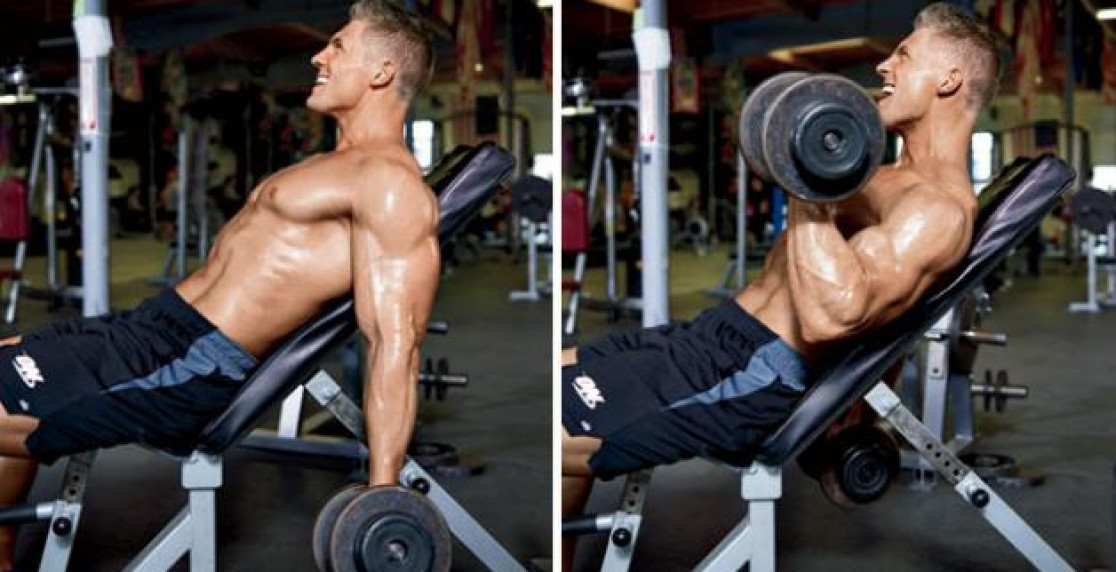
Sit on an adjustable bench set to approximately 45-degrees while holding a pair of dumbbells. Retract and depress your shoulder blades (pull them together and down) as you lay back on the bench.
Keep your feet flat and allow your arms to hang straight towards the ground. Keep your shoulder blades pinned to the bench throughout the exercise. Locking your shoulder blades into place will improve your form and boost your strength.(5)
Form tip: If your head comes off the bench, your upper back and shoulder blades will follow. Keep your head pressed into the bench during the entire set and resist the urge to look straight ahead.
Step 2 — Curl with Your Elbows Pointing Down
Supinate your hands (turn your palms up) and begin to curl both weights up. Keep your upper arms vertical, Your elbows should point straight down, not forward towards your feet.
Bringing your elbows forward takes tension off the biceps and introduces momentum, which makes the exercise less effective. Curl the dumbbells as high as possible without losing the vertical upper arm position.
Form tip: For increased stability, “over-supinate” throughout the repetition — think about keeping your pinky higher than your thumb — and “over-grip” the dumbbell like you’re trying to crush the handle into dust. Supination and gripping have been shown to enhance rotator cuff activity which results in a stronger, more stable shoulder position.
Step 3 — Lower Without Releasing Tension
Keep your upper arms locked vertically as you lower the dumbbells slowly. Don’t allow your thumbs to point up as you lower the weight. Don’t bounce into or out of the bottom position. Bouncing or quickly rebounding engages the stretch-shortening cycle, which makes this exercise less effective.
Maintain control as your arm straightens and never lose tension on the target muscles and tendons. Feel and visualize your muscle fibers being stretched.
Form tip: Savor the negative. Because the exercise requires relatively lighter weights, you need a longer time under tension to achieve an effective training stimulus. Prolonging the eccentric (lowering) phase is a favored strategy. A four-second eccentric is a good place to start.

